DIY Cardboard, Plywood, and Plexiglass Desk Dividers
A desk divider is a structure used to create defined working zones and a physical barrier between your workspace and the rest of the room. It could be made of different materials, including wood, cardboard, or glass. Desk dividers prove very useful in many ways, such as protecting school students from distractions while doing their homework. They also help by providing a semblance of privacy while working and even helping you concentrate better.
Cardboard and Plywood Desk Divider
Foldable Desk Divider
A foldable desk divider separates both the sides and the front view of whoever is sitting at the desk. This type of desk divider allows you to block out everything going on beyond it, thus giving you a getaway from any form of distraction.
Tools and Materials
The materials you will need are cardboard, duct tape, tape ruler, scissors, glue, paint, and lever or table clamps.
Instruction
Step 1: First, you start by measuring the breadth and length of the table. If you don’t want to divide the whole desk, you can measure the part you want to divide and make the cardboard fit the measurement.
Step 2: The cardboard should be cut to cover the length and breadth. This can be done with cardboard folded at two sides (where it curves, at the edge between the length and breadth of the table), or the cardboard is cut into three pieces. One of the pieces should be the same breath as the table, while the other two should be the same length as the table’s length.
Step 3: The three pieces are attached (matching the table’s breadth in the middle) using either tape or glue.
Step 4: Cover the cardboard with duct tape or paint and design the cardboard with a color of your choice. Pictures and paintings can also be glued to the cardboard, depending on your preference.
Step 5: Finally, install your desk divider using the lever clamp.
Non-Foldable Desk Divider
If you are a teacher who needs a surefire way to prevent students from cheating during tests, desk dividers will undoubtedly be your answer. To ensure that your students are not easily distracted, desks with dividers can help a ton.
While there are permanent desk dividers, sometimes you need a movable, non-permanent structure. A non-foldable desk divider works by separating the front view of the table but not the sides. It is ideal for a room or office not shared with other people. Desk partitions are usually expensive, making them not so feasible when you want to get many of them or prefer to save your coins.
There is no other way to get your hands dirty and make your own. This process can be fun, and if you have students, you can recruit their help.
To start this project, begin by gathering your materials.
Tools and Materials
You will need some cardboard, glue, four pieces of plywood (measured 7 inches more than the height you want your desk divider to be), duct tape, tape ruler, and a pair of scissors.
Instruction
Step 1: Use the tape rule to measure the table’s breadth.
Step 2: Cut the cardboard to fit the table’s breadth with the scissors.
Step 3: Duct tape can come in many fun colors and designs. Pick whatever you want and cover the cardboard in duct tape. Ensure the cardboard is thoroughly covered with duct tape.
Step 4: You continue the process by using glue to attach each cardboard end to the planks. There should be two planks on each side, so the planks face each other and cover the ends of the cardboard. The glue can be regular adhesive glue, applied with a hot glue gun, or replaced by nails or drills, depending on what you have.
Step 5 (Optional): If you do not want to use duct tape, you can use paint. If you are feeling adventurous, you may go ahead to paint your wonderful desk designers. If you decide to paint, leave them out to dry for a bit before installation.
Step 6: Finally, you can install your divider across the breadths of your table! The extra seven inches should be for the grasp of the plank on the sides of the table.
Center Desk Divider
A center desk diver works best to partition the desk into two parts and create a private space to work.
Tools and Materials
The materials you will need are scissors, duct tape, planks, table clamps, tape rule, glue, or nails.
Instruction
Step 1: First, measure the center of the table across its length using the tape rule.
Step 2: Cut the cardboard to fit the length of the table, and to the height you want your desk divider to be.
Step 3: Cover the cardboard with duct tape of your choice or decorate it according to your preference.
Step 4: Attach both ends of the cardboard to the planks using glue or nails and install the divider using table clamps.
Step 5: As stated before, you may choose to go the extra step and paint your desk dividers. If you choose to paint, do not forget to leave the divider outside to dry for a little while before you finally install it on your table.
Step 6: Install your desk divider.
Desk dividers offer many significant advantages and can be essential in boosting productivity.
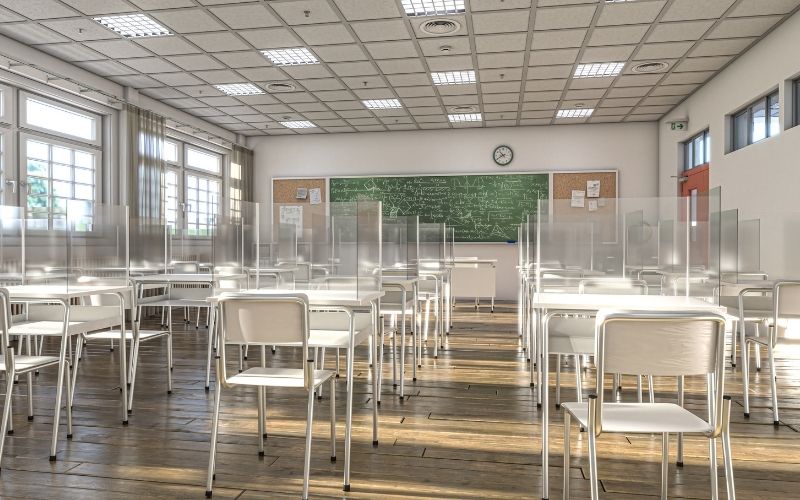
Plexiglass Desk Dividers
In a world where the pandemic is still a serious safety concern, desk dividers are an additional measure to ensure you and your students are safe. There has been an increased use of plexiglass for all kinds of partitions, and luckily for you, plexiglass dividers are easy to make!
The materials you will need to make your plexiglass divider are plexiglass acrylic sheets, sheet metal, and pan head screws. (L-shaped sheet metals are the easiest to work with.)
Tools and Materials
For this project, you will need many tools, including a hacksaw, a drill, a screwdriver, sandpaper, measuring tape, and, of course, a pencil.
Instruction
Step 1: Measure the dimensions of your table.
Step 2: If your plexiglass and sheet metal are not precut to your desired dimensions, go ahead and use your hacksaw to make adjustments. When you cut them, they will have jagged edges. Make sure to use your sandpaper to smooth the jagged edges.
Step 3: Align your sheet metal with your plexiglass such that the plexiglass is laying flat on one panel of the sheet metal.
Step 4: Drill a hole and screw in your plexiglass onto the sheet metal.
Step 5: Repeat Step 3 and Step 4 along the opposite side of the plexiglass sheet.
Step 6: If you find it necessary, measure your sheet metal bracket an inch longer than your plexiglass sheet. This way, there is room underneath to allow minimal communication as would be necessary for an office.
If you want to elevate and maximize your desk time for more productivity, desk dividers are perfect for you!