Drywall Repair Clips Just Made Your Patching Job 10x Easier
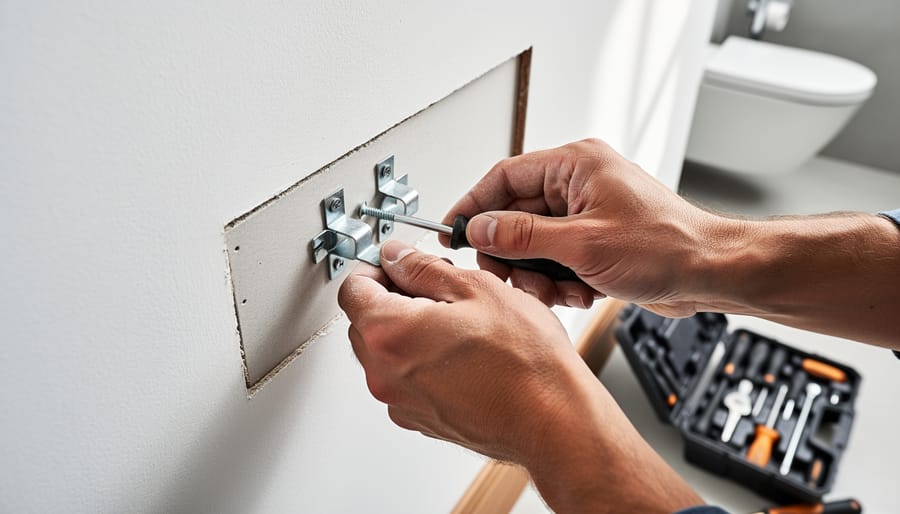
Forget the mess and complexity of traditional professional drywall repair techniques—drywall repair clips transform damaged walls into smooth surfaces in under an hour, no experience required. These ingenious metal clips grip existing drywall edges and hold your patch firmly in place, eliminating the frustration of cutting back to studs or installing wooden backing boards. Simply insert the clips into the hole’s edges, slide your pre-cut drywall patch into the brackets, tighten the built-in screws to secure everything flush, and you’re ready to tape and mud. The real game-changer? You’ll work from the front of the wall only, making repairs possible in tight spaces where traditional methods fail—behind toilets, between cabinets, or in finished basements with no stud access. Whether you’re tackling doorknob damage, removing old fixtures, or fixing those mysterious holes that appeared before moving day, repair clips deliver professional-looking results without the professional price tag or the need to open up large sections of your wall.
What Are Drywall Repair Clips (and Why Should You Care)?
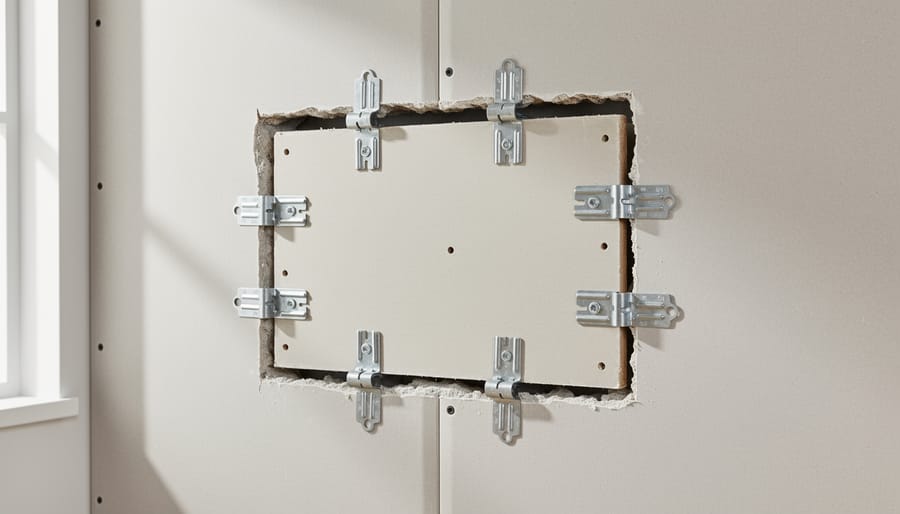
Drywall repair clips are small metal fasteners designed to make fixing holes in your walls significantly easier than traditional methods. Think of them as brackets that grip onto the edges of your drywall, creating a stable frame for your patch piece without requiring you to cut a larger hole or work behind the wall.
Here’s how they work: these clips slide onto the edge of your cut hole and span across the opening. When you drive screws through the clip and into your patch piece, the clip pulls tight against both the existing wall and the new patch, holding everything securely in place. It’s a clever mechanical solution that eliminates the need for wooden backing boards.
The problem they solve is huge for DIYers. Traditionally, patching drywall meant cutting the hole into a perfect square or rectangle, then somehow attaching wooden backing strips behind the wall to support your patch. This required reaching into the wall cavity, holding boards in awkward positions, and pre-drilling screws at uncomfortable angles. It was time-consuming, frustrating, and sometimes impossible depending on what was behind your wall.
Drywall repair clips flip this process on its head. Instead of working blind behind the wall, everything happens from the front. You simply cut your hole, attach the clips, insert your patch, and secure it. No wooden boards, no contortionist moves, and the repair stays flush with your existing wall. For holes ranging from a few inches to about eight inches, these clips transform a challenging project into something manageable in under an hour.
When to Use Repair Clips vs. Other Methods
Drywall repair clips work best for holes between 2 and 8 inches in diameter—think doorknob dents, small punch-throughs, or removed outlet boxes. They’re your go-to solution when the damage is too large for simple spackling but not so extensive that you need to replace entire wall sections. The beauty of clips is their speed and simplicity compared to cutting and installing traditional backing boards.
These clips shine when your wall studs aren’t conveniently located near the damaged area. Traditional repairs often require cutting back to the nearest stud, which means creating a larger hole than necessary. Repair clips eliminate that hassle entirely, saving you time and materials.
However, clips aren’t ideal for every situation. If your drywall is water-damaged, crumbling, or showing signs of mold, you’ll need to address those underlying issues first—repair clips won’t fix compromised materials. Similarly, holes larger than 8 inches or those extending across wall studs typically require traditional blocking methods for proper structural support.
For very small holes under 2 inches, simple patching compound or a mesh patch might be more cost-effective. When tackling other home repairs alongside your drywall project, consider whether repair clips fit your skill level and timeline—they’re perfect for quick, confident fixes that look professionally done.
What You’ll Need to Get Started
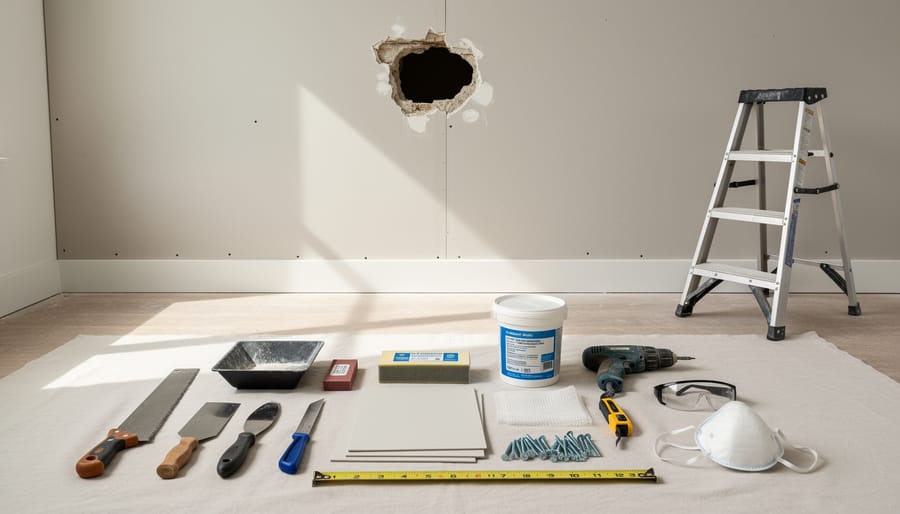
Before you start your repair project, gather these essential supplies to ensure a smooth process. At the heart of your repair, you’ll need drywall repair clips—the metal fasteners that bridge the damaged area and hold your patch securely in place. Most clips come in packages of four to eight, and one or two pairs typically handle holes up to six inches.
You’ll also need a drywall patch piece cut slightly larger than your hole. This can be scrap drywall from a home improvement store or leftover material from previous projects. For finishing, grab a container of pre-mixed joint compound (also called mud), which creates that smooth, seamless surface.
Your basic tool kit should include a utility knife for cutting drywall and opening compound containers, a drywall saw for creating clean edges around the damage, and a putty knife or taping knife for spreading compound. A drill or screwdriver helps secure the clips, though many clips simply twist into place by hand.
Finally, have sandpaper (120-grit works well), a damp sponge for smoothing, and primer-paint ready for the finishing touches. With these materials assembled, you’re ready to tackle that unsightly wall damage with confidence.
Step-by-Step: Repairing Drywall with Clips
Preparing the Damaged Area
Before installing your drywall repair clips, you’ll need to prep the damaged area properly. Start by using a utility knife or drywall saw to square off the hole’s edges. Don’t worry if the damage is irregularly shaped—transforming it into a clean rectangle or square makes the repair much easier and helps the clips grip securely.
Remove any loose drywall, dust, or debris from around the opening. A shop vacuum works great here, or simply use a brush to clear away crumbling material. The goal is creating smooth, solid edges for the clips to anchor against.
Check that the hole’s perimeter is at least half an inch away from any studs. If you’re too close to framing, the clips won’t have room to slide behind the drywall. Pro tip: Take a quick photo of the prepared hole with your phone—it’ll help you remember measurements when cutting your patch piece later.
Installing the Repair Clips
Position your first clip at the top edge of the hole by sliding the flanged side behind the drywall while keeping the clip portion visible on the front. The flange should sit flush against the back of your wall. Press firmly to ensure good contact, then secure it by turning the built-in tabs clockwise until they grip tightly. You’ll feel some resistance as the clip locks into place.
For holes up to 6 inches, use four clips—one on each side. Larger openings up to 12 inches may require six to eight clips spaced evenly around the perimeter, typically every 4 to 6 inches. The key is ensuring your patch has solid support all around.
As you install each clip, double-check that it’s sitting level with the wall surface. Clips that protrude or sit too deep will create bumps or valleys in your finished repair. If you’re using a smartphone, snap a quick photo from different angles to spot any misalignment before moving forward. Once all clips are secure, give each one a gentle tug to confirm it won’t budge during the patching process.
Cutting and Fitting Your Patch
Now it’s time to prep your patch piece. Start by measuring the hole opening—the space between the clips should be slightly smaller than your damaged area since the clips overlap the edges. Cut a new piece of drywall to fit snugly within this opening using a utility knife or drywall saw. Score one side deeply, snap it along the line, then cut through the paper backing.
Before placing your patch, double-check that it fits properly without forcing. It should slide in easily with minimal wiggling. If it’s too tight, trim small amounts until you get a good fit—better to take your time here than crack your new patch.
Once satisfied with the fit, apply a thin bead of construction adhesive or joint compound around the back edges of your patch. This isn’t strictly necessary, but it helps create a stronger bond. Position the patch into the opening and press it firmly against the clips. The clips will grip the back of the patch automatically, holding everything securely in place while you finish the job with joint compound and tape.
Applying Joint Compound and Finishing
Once your drywall patch is securely in place with the repair clips, it’s time to blend it seamlessly into your wall. The key to professional-looking results is patience and a multi-coat approach.
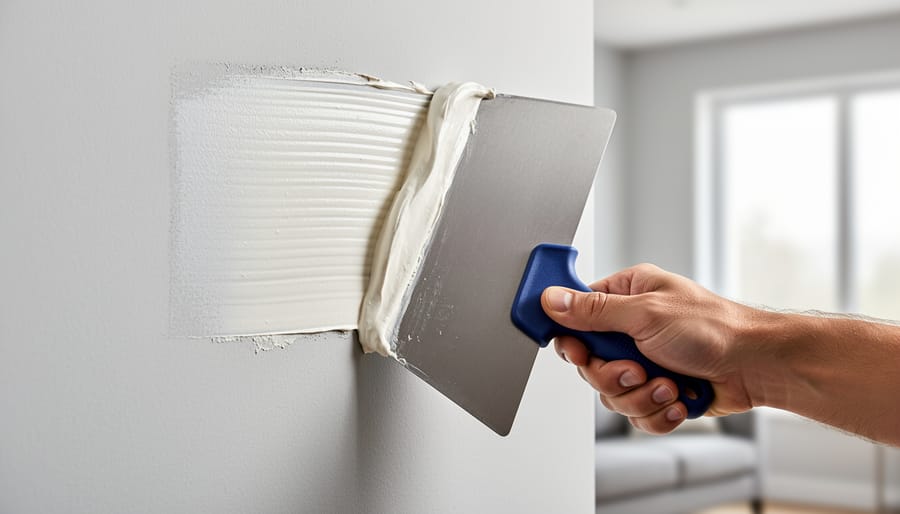
Start with your first coat of joint compound, sometimes called mud. Using a 6-inch drywall knife, spread a thin layer over the entire patch area, extending about 2 inches beyond the edges. Don’t worry about perfection here—this coat simply fills gaps and provides a base. Let it dry completely, typically 12-24 hours depending on humidity.
Apply your second coat with an 8 or 10-inch knife, feathering the edges outward to create a smooth transition. This wider application helps the repair disappear into the surrounding wall. The goal is to build up the surface gradually rather than glob on thick layers that will crack or take forever to dry.
After the second coat dries, lightly sand with 120-grit sandpaper. Pro tip: use a handheld work light held at an angle to spot imperfections—shadows will reveal any bumps or dips you missed. A damp sponge can also smooth minor rough spots without creating dust clouds.
Most repairs need a third thin coat to achieve that perfectly smooth, paintable finish. Apply it sparingly, focusing on any remaining low spots or visible seams. Once dry, do a final light sanding with 150 or 220-grit paper. Wipe down with a damp cloth to remove dust, prime the area, and you’re ready to paint.
Pro Tips for a Seamless Repair
Want your repair to look truly invisible? Start by choosing clips that match your hole size—oversized clips can create bulges that show through the finished surface. Here’s a pro move: lightly sand the edges of your patch piece at a 45-degree angle before installing. This creates a smoother transition and makes blending much easier.
For textured walls, snap a photo of the texture before you start. You can recreate most patterns using a damp sponge, stippling brush, or even a crumpled plastic bag. Practice on cardboard first to nail the technique. Apply your texture while the final coat of compound is still slightly wet for the best results.
Common mistake alert: don’t overload your joint compound. Multiple thin coats always beat one thick layer. Each coat should extend slightly beyond the previous one, feathering the edges to blend seamlessly with the existing wall. Allow proper drying time between coats—rushing leads to cracking.
Temperature matters more than you’d think. Work in rooms between 55-70 degrees Fahrenheit for optimal drying and adhesion. Cold temperatures slow drying time, while heat can cause cracking.
Finally, invest in a quality taping knife. A bent or damaged blade creates ridges that require extra sanding to fix. Pair these techniques with other money-saving home improvement tricks to maximize your renovation budget while achieving professional-looking results.
Troubleshooting Common Issues
Even with the right technique, you might encounter a few hiccups during your repair. If clips aren’t holding securely, the issue is usually that the hole is too large for the clip’s grip range. Try using a larger clip size or adding a wooden backer board for extra support. You can also check that you’re not over-tightening the screw, which can strip the clip’s threading.
Uneven patches often result from applying joint compound too thickly in one go. The fix? Apply thin layers instead, letting each dry completely before adding the next. Use a wide drywall knife and feather the edges outward to blend seamlessly with the surrounding wall.
Visible seams and ridges appear when compound isn’t sanded properly. After your final coat dries, use fine-grit sandpaper (220-grit works great) and sand in a circular motion until smooth. A handheld light held at an angle helps spot imperfections you might miss in regular lighting.
Cracking compound typically means you applied it too thick or didn’t allow proper drying time between coats. If cracks appear, lightly sand the area, apply a thin skim coat, and be patient. Consider using a setting-type compound for areas prone to movement, as it’s less likely to crack than regular pre-mixed versions.
Drywall repair clips truly simplify what once seemed like an intimidating task. With just a few clips and basic tools, you can achieve professional-looking results that blend seamlessly with your existing walls. This method eliminates the guesswork and mess of traditional repairs, making it perfect for beginner DIY projects. So grab those clips and tackle that wall damage with confidence—you’ve got this!
